
- July 25, 2015
- Posted by: Surender Kumar
- Category: Cisco ASA
Getting Started with Cisco ASA
Table of Contents
Getting Started with Cisco ASA is pretty much same as that of other Cisco devices like Routers and Switches. Like other Cisco devices, ASA is also provided with a console port and console cable. For initial configuration, command line interface is accessed directly from the console port. Later, you can configure remote access using Telnet or SSH.
Initial Configurations
Step 1 Connect a PC to the console port using the provided console cable, and connect to the console using a terminal emulator set for 9600 baud, 8 data bits, no parity, 1 stop bit, no flow control.
See the hardware guide for your ASA for more information about the console cable.
Step 2 Press the Enter key to see the following prompt:
hostname>
This prompt indicates that you are in user EXEC mode. Only basic commands are available from user EXEC mode.
Step 3 To access privileged EXEC mode, enter the following command:
hostname> enable

Password:
All non-configuration commands are available in privileged EXEC mode. You can also enter configuration mode from privileged EXEC mode.
Step 4 Enter the enable password at the prompt.
By default, the password is blank, and you can press the Enter key to continue.
The prompt changes to the following:
hostname#
To exit privileged mode, enter the disable, exit, or quit command.
Step 5 To access global configuration mode, enter the following command:
hostname# configure terminal
The prompt changes to the following:
hostname(config)#
Making any Configuration change in ASA requires you to be in global configuration mode which is denote by hostname(config)# prompt. You can begin to configure the ASA from global configuration mode. To exit global configuration mode, enter the exit, quit, or end command. The example to change the ASA password is given below:
ciscoasa# configure terminal
ciscoasa(config)# passwd Abc@123
ciscoasa(config)# enable password cisco123
ciscoasa(config)# exit
ciscoasa# copy running-config startup-config
The passwd command sets the login password on Cisco ASA and enable password command protects the enable mode with password. The copy running-config startup-config command saves the running-configuration into startup-configuration file so that it can be reused to build running-configuration after ASA is restarted.
Searching and Filtering the CLI Output
The Cisco ASA provides ways of searching through large amounts of command output and filtering output to exclude information you do not need. These features are enabled for show and more commands, which generally display large amounts of data.
Understanding Regular Expressions
A regular expression is a pattern (a phrase, number, or more complex pattern) the CLI String search feature matches against show or more command output. Regular expressions are case-sensitive and allow for complex matching requirements. A regular expression can be a single-character pattern or a multiple-character pattern. Means, a regular expression can be a single character that matches the same single character in the command output or multiple characters that match the same multiple characters in the command output. The pattern in the command output is referred to as a string.
See the example given below:
When using running-config command, the ASA will show you the complete running configuration which is not what you want to see every time.
ciscoasa# show running-config | ?

  begin    Begin with the line that matches
  exclude  Exclude lines that match
  grep     Include/exclude lines that match
  include  Include lines that match
Let us consider that you only want to list the available interfaces on ASA and nothing else. In this case, you can use pipe character (|) which is like a vertical bar at the end of show running-config command and then use any one of the above shown statements (begin, include, exclude, grep). So, When you only want to list the interfaces on ASA and omitting everything else, run the command as shown below:
ciscoasa# show running-config | include interface
interface BVI1
interface GigabitEthernet0
interface GigabitEthernet1
interface GigabitEthernet2
interface GigabitEthernet3
interface GigabitEthernet4
The show running-config | include interface command lists only 5 interfaces available on ASA.
You can use begin keyword when you want the ASA to start listing the output from a specific phrase. For example, if you run show run command without any additional parameter, you will see something as shown below:
ciscoasa# show running-config
: Saved
:
ASA Version 8.4(2)
!
firewall transparent
hostname ciscoasa
enable password 8Ry2YjIyt7RRXU24 encrypted
passwd 2KFQnbNIdI.2KYOU encrypted
names
!
interface BVI1
 ip address 192.168.10.1 255.255.255.0 standby 192.168.10.2
!
interface GigabitEthernet0
 shutdown
 nameif inside
 bridge-group 1
 security-level 100

[output cut]
But what if you want to start the output right from interface configuration? See the command below:
ciscoasa# show running-config | begin interface
interface BVI1
 ip address 192.168.10.1 255.255.255.0 standby 192.168.10.2
!
interface GigabitEthernet0
 shutdown
 nameif inside
 bridge-group 1
 security-level 100

[output cut]
Notice that this time the output is started right from interface configuration point.
Let us try one more example quickly.
Suppose that you want to list the Interfaces with their MAC addresses. You can combine two phrases as shown below:
ciscoasa# show interface | include (Interface|MAC)
Interface BVI1 is up, line protocol is up
        MAC address N/A, MTU not set
Interface GigabitEthernet0 "inside", is administratively down, line protocol is up
        MAC address 0000.aba6.dc00, MTU 1500
Interface GigabitEthernet1 "", is administratively down, line protocol is up
        MAC address 0000.aba6.dc01, MTU not set
Interface GigabitEthernet2 "", is administratively down, line protocol is up
        MAC address 0000.aba6.dc02, MTU not set
Interface GigabitEthernet3 "", is administratively down, line protocol is up
        MAC address 0000.aba6.dc03, MTU not set
Interface GigabitEthernet4 "", is administratively down, line protocol is up
        MAC address 0000.aba6.dc04, MTU not set
Set the Hostname and Domain Name
You can configure the firewall with a hostname and domain name using commands as shown below:
ciscoasa(config)# hostname ASA1
ASA1(config)# domain-name techtutsonline.com
ASA1(config)#
Configuring ASDM Access for Appliance
Adaptive Security Device Manager (ASDM) access for Cisco ASA requires some minimal configuration so you can communicate over the network with a management interface.
-
Accessing ASDM Using the Factory Default Configuration
Connect to ASDM using the following interface and network settings:
• The management interface depends on your model:
– ASA 5505 — The switch port to which you connect to ASDM can be any port, except for Ethernet 0/0.
– ASA 5510 and higher — The interface to which you connect to ASDM is Management 0/0.
• The default management address is 192.168.1.1.
• The clients allowed to access ASDM must be on the 192.168.1.0/24 network. The default configuration enables DHCP so your management station can be assigned an IP address in this range.
• Start the ASDM.
-
Accessing ASDM Using Non-Default Configuration (ASA 5505)
If you do not have a factory default configuration, or want to change to transparent firewall mode, perform the following steps:
Step 1 Access the CLI as shown in the beginning of this section.
Step 2 (Optional) If you want to change the firewall mode from default (router mode) to Transparent mode, use the command as shown below
hostname> enable
hostname# config term
hostname(config)# firewall transparent
Step 3 Do one of the following to configure a management interface, depending on your mode:
- For Routed Mode, use the following commands:
hostname(config)#
hostname(config)# interface vlan 1
hostname(config-if)# ip address 192.168.10.1 255.255.255.0
hostname(config-if)# nameif inside
INFO: Security level for "inside" set to 100 by default.
hostname(config-if)# security-level 100
hostname(config-if)#
The above commands configure vlan 1 interface in routed mode. The security-level is a
number between 1 and 100, where 100 is the most secure and 0 is untrusted network. ASA will automatically set the security level to 100 for interface when you give the name “inside” using nameif inside command because it assumes the inside network to be most secure. But I’ve still issued security-level 100 command for demonstration purpose.
- For Transparent mode, use the following commands:
hostname(config)# interface bvi 1
hostname(config-if)# ip address 192.168.10.1 255.255.255.0
hostname(config)# interface vlan 1
hostname(config-if)# bridge-group 1
hostname(config-if)# nameif inside
INFO: Security level for "inside" set to 100 by default.
hostname(config-if)# security-level 100
hostname(config-if)#
The above configuration commands configures a bridge virtual interface and assigns a management VLAN to the bridge group. The security-level is a number between 1 and 100, where 100 is the most secure. This is needed if you are using ASA in transparent mode.
Step 4 Enable the management switchport and assigns it to the management VLAN as shown below
hostname(config)# interface ethernet 0/1
hostname(config-if)# switchport access vlan 1
hostname(config-if)# no shutdown
Step 5 Enable DHCP for the management host on the management interface network. Make sure you do not include the management address in the range.
hostname(config)# dhcpd address 192.168.10.5-192.168.10.254 inside
hostname(config)# dhcpd enable inside
Note that by default, if IPS module is installed, it uses 192.168.1.2 for its internal management address, so be sure not to use this address in the DHCP range. You can later change the IPS module management address using the ASA if required.
Step 6 Enable the HTTP server for ASDM as shown below.
hostname(config)# http server enable
Step 7 Allow the management (inside) host to access ASDM.
hostname(config)# http 192.168.10.0 255.255.255.0 inside
Replace the 192.168.10.0 255.255.255.0 with your own IP subnet and mask.
Step 8 Save the running-config to startup-config.
hostname(config)# copy running-config startup-config
Step 9 Start the ASDM.
-
Accessing ASDM Using Non-Default Configuration (ASA 5510 and Higher)
If you do not have a factory default configuration, or want to change the firewall or context mode on ASA 5510 or above, perform the following steps:
Step 1 Access the CLI as shown in the beginning of this section.
Step 2 (Optional) If you want to change the firewall mode from default (router mode) to Transparent mode, use the command as shown below
hostname> enable
hostname# config term
hostname(config)# firewall transparent
Step 3 Use the following to configure the management interface:
hostname(config)# interface management 0/0
hostname(config-if)# ip address 192.168.10.1 255.255.255.0
hostname(config-if)# nameif management
hostname(config-if)# security-level 100
hostname(config-if)# no shutdown
The above commands configure the Management 0/0 interface. The security-level is a number between 1 and 100, where 100 is the most secure.
Step 4 Enable DHCP for the management host on the management interface network. Make sure you do not include the Management 0/0 address in the range.
hostname(config)# dhcpd address 192.168.1.2-192.168.1.254 management
hostname(config)# dhcpd enable management
Step 5 Enable the HTTP server for ASDM as shown below.
hostname(config)# http server enable
Step 6 Allow the management host to access ASDM.
hostname(config)# http 192.168.10.0 255.255.255.0 management
Replace the 192.168.10.0 255.255.255.0 with your own IP subnet and mask.
Step 7 Save the running-config to startup-config.
hostname(config)# copy running-config startup-config
Step 8 (Optional) Set the mode to multiple mode. When prompted, confirm that you want to convert the existing configuration to be the admin context. You are then prompted to reload the ASASM.
hostname(config)# mode multiple
Step 9 Start the ASDM.
Starting ASDM
You can start ASDM using two methods:
• ASDM-IDM Launcher (Windows only) — The Launcher is an application downloaded from the ASA using a web browser that you can use to connect to any ASA IP address. You do not need to re-download the launcher if you want to connect to other ASAs. The Launcher also lets you run a virtual ASDM in Demo mode using files downloaded locally.
• Java Web Start — You need to connect with a web browser and then save or launch the Java Web Start application for each ASA that you manage. You can optionally save the application to your PC but you need separate applications for each ASA IP address.
Connecting to ASDM for the First Time
To connect to ASDM for the first time to download the ASDM-IDM Launcher or Java Web Start application, perform the following steps:
Step 1 From a supported web browser on the ASA network, enter the following URL:
https://ASA_IP_Address/, where ASA_IP_Address is the IP address assigned to the management interface of ASA.
The ASDM launch page appears with the following buttons:
• Install ASDM Launcher and Run ASDM (Windows only)
• Run ASDM
• Run Startup Wizard
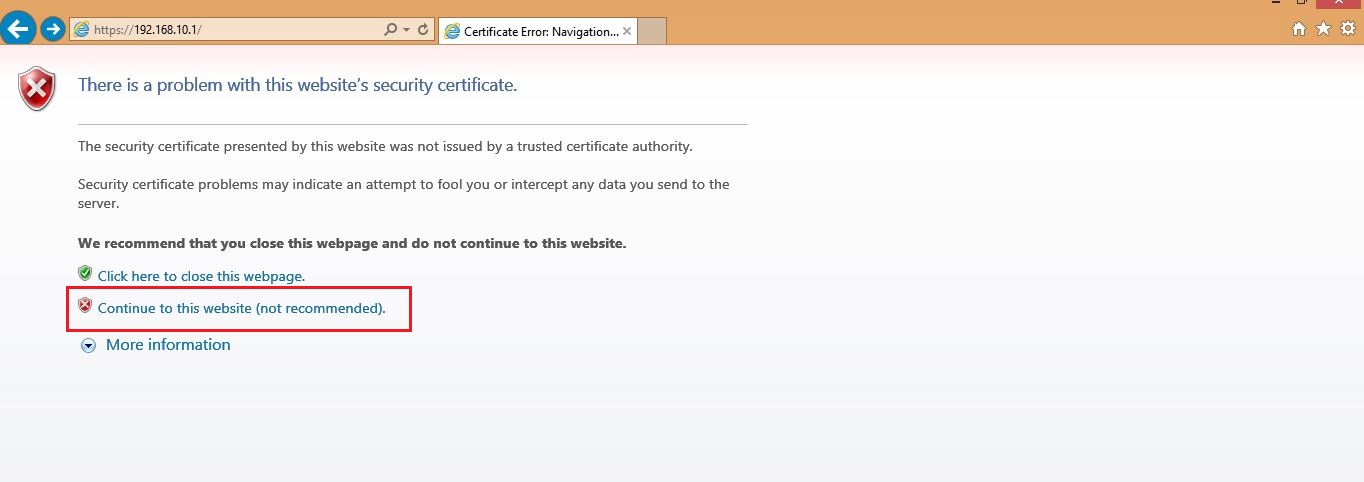
Web browser will display certificate error since the ASA certificate is not issued by any trusted certification authority. Press “Continue to this website” option as shown above. you will see the screen as follows:
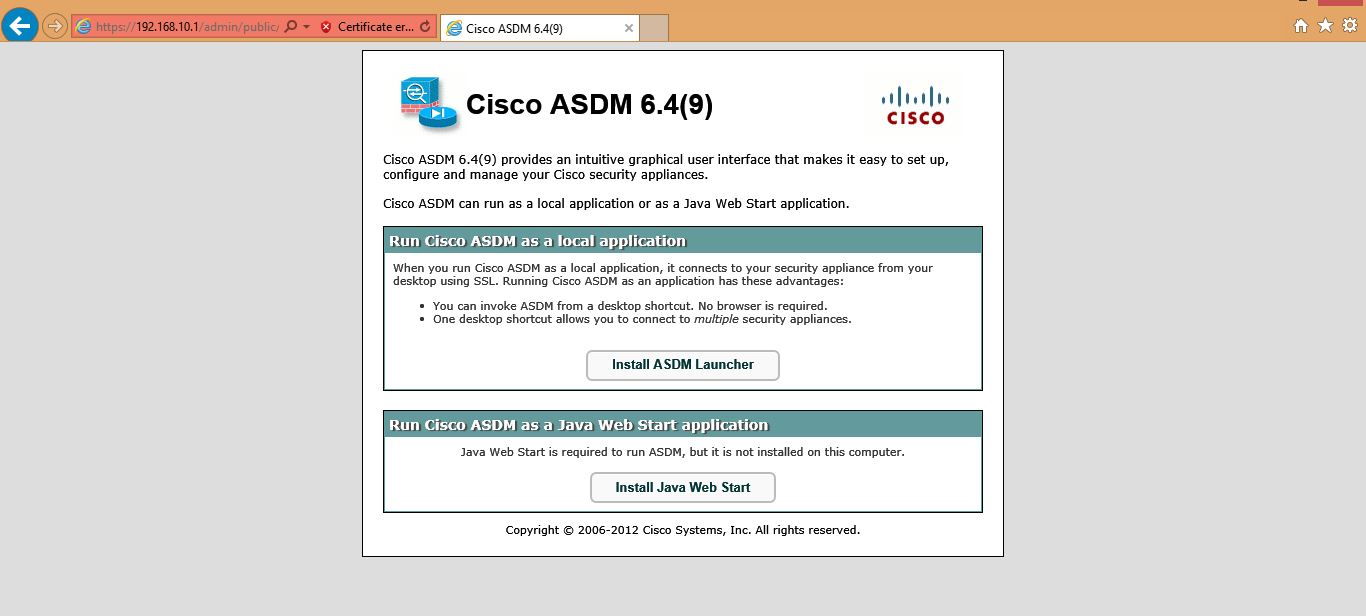
Step 2 To download the Launcher:
i). Click Install ASDM Launcher and Run ASDM.
ii). Enter the username and password, and click OK. For a factory default configuration, leave these fields empty. With no HTTPS authentication configured, you can gain access to ASDM with no username and the enable password, which is blank by default. With HTTPS authentication enabled, enter your username and associated password.
iii). Save the installer to your PC, and then start the installer. The ASDM-IDM Launcher opens automatically after installation is complete.
Step 3 To use the Java Web Start application:
i). Click Run ASDM or Run Startup Wizard.
ii). Save the application to your PC when prompted. You can optionally open it instead of saving it.
Launch ASDM
Step 1 After downloading and installing Launcher as shown above, Start the ASDM-IDM Launcher application.
Step 2 Enter or choose the ASA IP address or hostname to which you want to connect.
Step 3 Enter your username and your password, and then click OK.
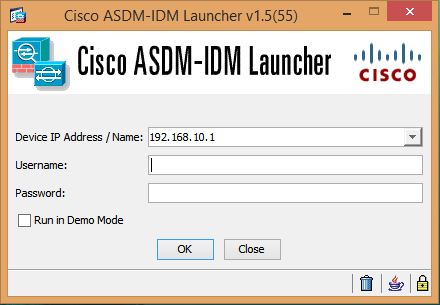
For a factory default configuration, leave these fields empty. With no HTTPS authentication configured, you can gain access to ASDM with no username and the enable password, which is blank by default.
With HTTPS authentication enabled, enter your username and associated password.
If there is a new version of ASDM on the ASA, the ASDM Launcher automatically downloads the new version and requests that you update the current version before starting ASDM.
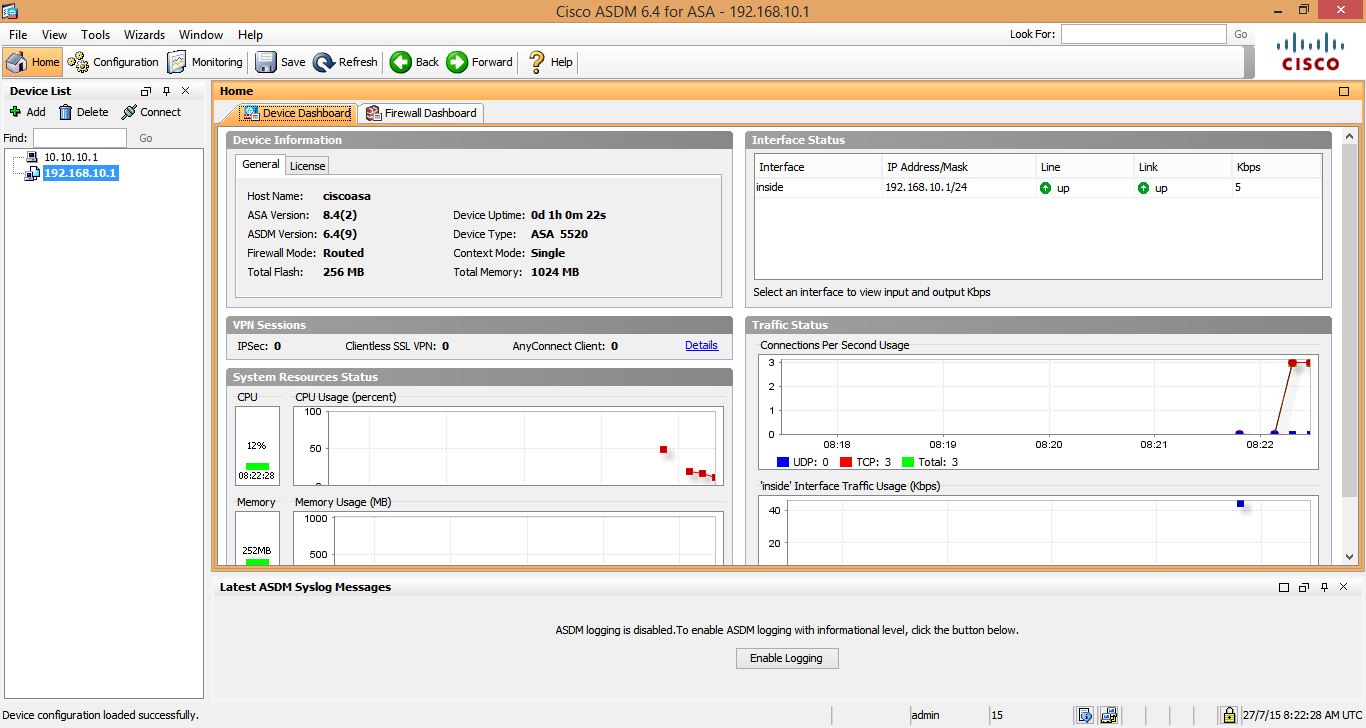
The main ASDM window will appear.
Using ASDM in Demo Mode
The ASDM Demo Mode, a separately installed application, lets you run ASDM without having a live device available. In this mode, you can do the following:
• Perform configuration and selected monitoring tasks via ASDM as though you were interacting with a real device.
• Demonstrate ASDM or ASA features using the ASDM interface.
• Perform configuration and monitoring tasks with the CSC SSM.
• Obtain simulated monitoring and logging data, including real-time syslog messages. The data shown is randomly generated; however, the experience is identical to what you would see when you are connected to a real device.
This mode has been updated to support the following features:
• For global policies, an ASA in single, routed mode and intrusion prevention
• For object NAT, an ASA in single, routed mode and a firewall DMZ.
• For the Botnet Traffic Filter, an ASA in single, routed mode and security contexts.
• Site-to-Site VPN with IPv6 (Clientless SSL VPN and IPsec VPN)
• Promiscuous IDS (intrusion prevention)
• Unified Communication Wizard
This mode does not support the following:
• Saving changes made to the configuration that appear in the GUI.
• File or disk operations.
• Historical monitoring data.
• Non-administrative users.
The below mentioned features are also not supported:
File Menu:
Save Running Configuration to Flash
Save Running Configuration to TFTP Server
Save Running Configuration to Standby Unit
Save Internal Log Buffer to Flash
Clear Internal Log Buffer
Tools Menu:
Command Line Interface
Ping
File Management
Update Software
File Transfer
Upload Image from Local PC
System Reload
Toolbar/Status bar > Save
Configuration > Interface > Edit Interface > Renew DHCP Lease
Configuring a standby device after failover
Factory Default Configurations
The factory default configuration is the configuration applied by Cisco to new ASAs. The factory default configuration is available only for routed firewall mode and single context mode.
- ASA 5505 — The factory default configuration configures interfaces and NAT so that the ASA is ready to use in your network immediately.
- ASA 5510 and higher — The factory default configuration configures an interface for management so you can connect to it using ASDM, with which you can then complete your configuration.
Restoring the Factory Default Configuration
This feature is available only in routed firewall mode; transparent mode does not support IP addresses for interfaces. In addition, this feature is available only in single context mode; an ASA with a cleared configuration does not have any defined contexts to configure automatically using this feature.
ASA 5505 Default Configuration
The default configuration is available for routed mode only. The default factory configuration for the ASA 5505 configures the following:
• Interfaces — Inside (VLAN 1) and outside (VLAN 2).
• Switchports Enabled and Assigned — Ethernet 0/1 through 0/7 switch ports assigned to inside. Ethernet 0/0 assigned to outside.
• IP Addresses — Outside address from DHCP; inside address set manually to 192.168.1.1/24.
• Network Address Translation (NAT) — All inside IP addresses are translated when accessing the outside using interface PAT.
• Traffic Flow — IPv4 and IPv6 traffic allowed from inside to outside (this behavior is implicit on the ASA). Outside users are prevented from accessing the inside.
• DHCP Server — Enabled for inside hosts, so a PC connecting to the inside interface receives an address between 192.168.1.5 and 192.168.1.254. DNS, WINS, and domain information obtained from the DHCP client on the outside interface is passed to the DHCP clients on the inside interface.
• Default Route — Derived from DHCP.
• ASDM Access — Inside hosts allowed.
ASA 5510 and Higher Default Configuration
The default factory configuration for the ASA 5510 and higher configures the following:
• Management Interface — Management 0/0 (management).
• IP Address — The management address is 192.168.1.1/24.
• DHCP Server — Enabled for management hosts, so a PC connecting to the management interface receives an address between 192.168.1.2 and 192.168.1.254.
• ASDM Access — Management hosts allowed.
Working with the Configuration Files
The ASA loads the configuration from a text file, called the startup configuration. This file resides by default as a hidden file in internal flash memory. However, you can specify a different path for the startup configuration.
When you enter a command, the change is made only to the running configuration in memory. You must manually save the running configuration to the startup configuration for your changes to remain after a reboot.
Saving Configuration Changes in Single Context Mode
To save the running configuration to the startup configuration, enter the following command:
hostname# copy running-config startup-config
Note:- You can use legacy command write memory which will perform same operation as that of copy running-config startup-config command.
Saving Configuration Changes in Multiple Context Mode
You can save each context (and system) configuration separately, or you can save all context configurations at the same time. The write-memory command saves the changes separately for each context or you can use write memory all command to save changes to all context configurations at the same time.
Viewing the Configuration
The show running-config and show startup-config commands let you view the running and startup configurations respectively.
Clearing and Removing Configuration Settings
ASA support various commands to erase specific settings or complete configuration at once. These commands are given below:
ASA5520(config)#
ASA5520(config)# clear config hostname
ciscoasa(config)#
The clear config command clears all the configuration for a specified command. In above example, the command clears the hostname on ASA and resets the hostname to default.
ciscoasa(config)# clear configure all
The clear configure all erases the running configuration. In multiple context mode, this command removes all contexts and stop them from running. The context configuration files are not erased, and remain in their original location.
ciscoasa(config)# write erase
The write erase command erases the startup configuration.
This concludes Getting Started with Cisco ASA section.